

THIS POST MAY CONTAIN AFFILIATE LINKS. PLEASE READ MY DISCLOSURE FOR MORE INFO. 

And that means if your site is still showing “Not Secure”, you can easily force an update manually in just a few simple steps.
Why should I make the switch for my blog?
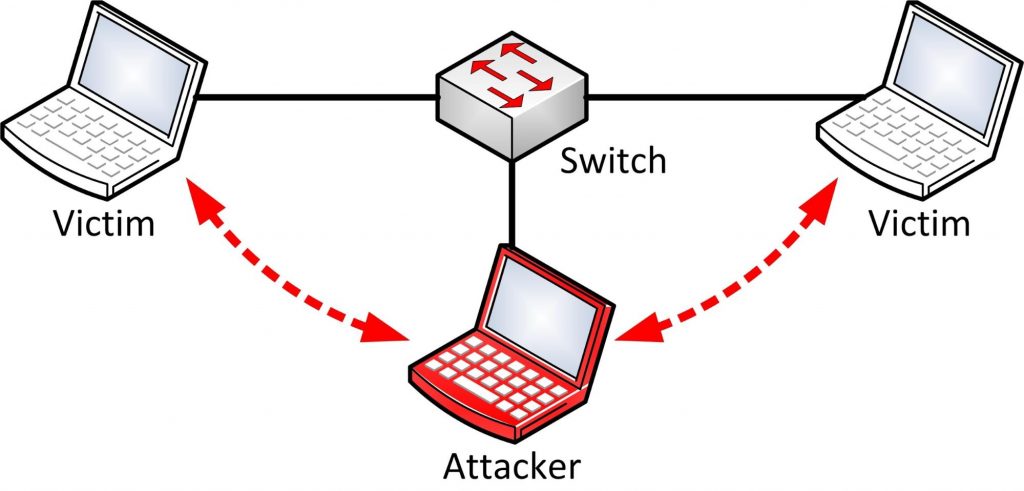
Well, aside from protecting users against Man in the Middle Attacks, HTTPS is a MUST if you want to leverage the many new exciting features in browsers.
However, if that does not make a strong case for you, then read on…
A few months back google announced that all sites and pages that only have the HTTP protocol and has not adopted the HTTPS encryption to their website will be labeled as “not secure”
And you know what that means right?
Customers will be reluctant or even get a bad first impression of your website.
Here’s an example…
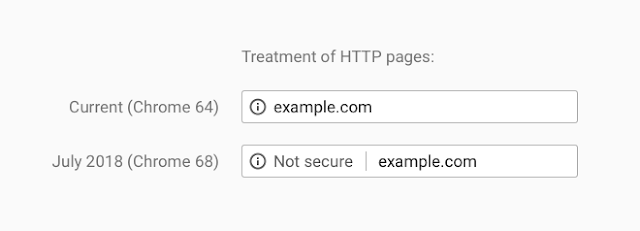

This is Google’s way of saying, “Upgrade or else”.
That is also not the worst part.
The worst part is that once your site gets branded as Insecure, it will affect your SEO in a very significant way.
Security is something Google has been taking very seriously. And it’s about to get real for you and me.
In the past, you might not see much improvement even if you switched to HTTPS.
Most website owners saw little to no improvement at all in their SEO rankings, but a few others did experiments with it and saw huge evidence to suggest that you should make the switch.
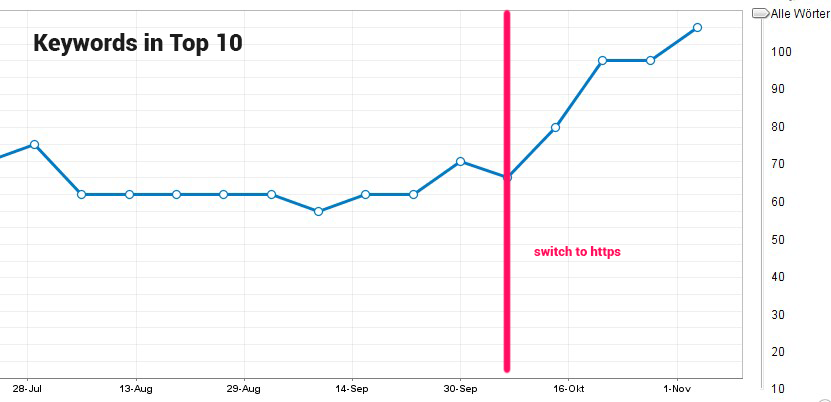

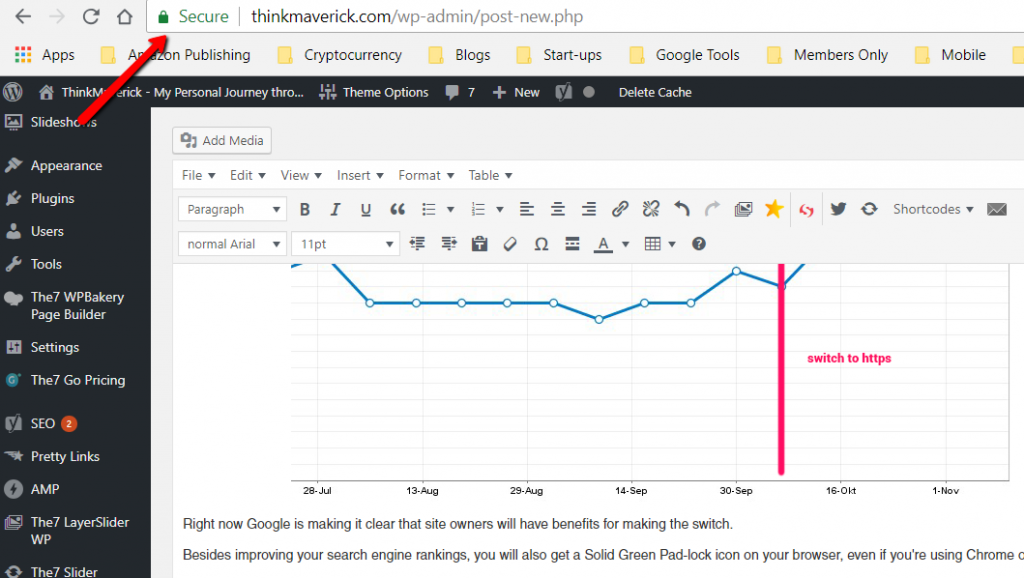
Right now Google is making it clear that site owners will have benefits for making the switch.
This has been the strongest nudge yet to drive the entire web community towards default encryption for web properties. And it has been a long time coming.
Besides improving your search engine rankings, you will also get a Solid Green Pad-lock icon on your browser, even if you’re using Chrome or Firefox.

If your site hasn’t made the switch, it will not get this ICON. And most times visitors have reported getting red screens from Google warning them not to access your site. I have experienced this countless times.
So the whole idea for HTTPS is just to protect the privacy and data of your website visitors or even customers if you’re running an e-commerce website. All the more the need for an extra layer of protection for your customers.
When a visitor enters his or her credit card details, you can be sure that they wouldn’t make the leap unless your site is secured.
So Explain HTTPS to me like i’m Five…
The Hypertext Transfer Protocol Secure (HTTPS) is the secure version of HTTP. Also dubbed as the Secure Socket Layer or SSL certificate for short.
It’s a protocol where data is sent between your browser (Chrome/Safari/Firefox) and the website you’re accessing.
Secure indicates that your connection is encrypted and cannot be eavesdropped by a third party.
So what does protocol mean?
In the technology world, a protocol is a set of rules.
For instance, the internet is governed by two protocols: TCP and IP.
TCP stands for transmission control protocol. This is what the HTTP uses to transfer packets of data over the internet.
Using HTTP is like buying a ticket to travel from A to B where you can just settle in your seat and take a nap till you arrive at your destination. Whereas, the TCP is just a raw blank slate where you have to maneuver; fill the gas and drive your car and steer until you reach your destination.
With HTTPS, you’re ensuring that your journey is safe and sound and no one else can temper with the journey you have set or bound for. No one else can trick visitors into giving them information instead of their intended recipient.
It ensures that when you visit a website, you’re actually seeing what the authors of the website intended, and not someone else like the government or a hacker who replaced the content with their own malware ridden content.
Think about this…
According to a Wired article, HTTPS has been around since 1995, and it took 20 years for us to get to 40 percent encrypted page loads, and then in just one year, boom! 50% of all the web.
That’s half a billion websites that have already made the switch to HTTPS.
Think of the biggest names in the internet space: Amazon, Facebook, Priceline, eBay, Netflix, Uber, etc… They all have made the switch over the years.
Google publicly indicated as well in 2015 that its search ranking factor would favor sites that use HTTPS over those that don’t.
So it’s a good thing to add HTTPS to all your pages.
The method I just discovered today while forcing a switch for my site is that if you’re with Hostgator, you can easily make the switch on ALL your PAGES automatically.

HTTPS not only gives you automatic encryption for your websites content, it protects your data integrity as well as prevent third party hacks that trick your customers or visitors into giving away their private information.

Do I really Need HTTPS?
YES. It is now absolutely necessary.
Google is about to shame all those INSECURE sites by driving away your visitors or customers.
Of course, if you’re just starting out with your new blog, you don’t have to.
But you could always take advantage of Hostgator’s Free SSL certificate and activate it in minutes.
On the other hand, if you’re trying hard to boost your websites traffic and getting your customers to trust you. You will need it because life for your website is about to get a lot more difficult.
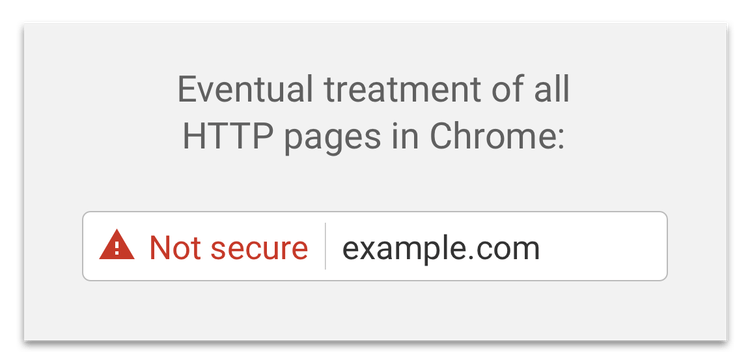
In addition to all those warnings displayed on HTTP pages, login fields from an earlier version of Chrome browsers have been marking pages the sign “Not secure”, while incognito, HTTP pages will display a Scary Red text with the phrase, “Not secure“

So in order to prevent any of your website or blog visitors from ever seeing this warning, you need to start getting a valid SSL certificate.
If you’re with Hostgator, you should already have one.
If you’re not…
The good news is that there’s also a free version of it available on the web. You don’t need to pay for a premium one, unless you want the other (extra features).
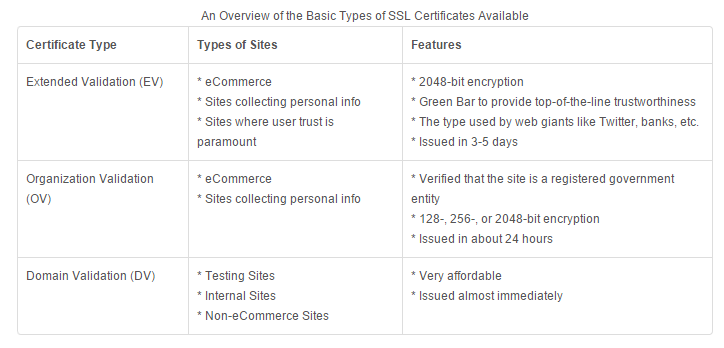
What are the Types of SSL Certificates?
There are THREE types of SSL Certificates you can get for your domain.
The easiest and most basic of all would be the Domain Validation or DV.
This is what I use and also recommended for most blogs that don’t conduct any online monetary transactions.
Organization Validation or OV – is what you will need if you’re collecting personal information from your websites visitors or you’re running a small e-commerce site that grabs user credit card details.
Extended Validation or DV – is the top of the line when it comes to SSL certificates. This comes with the highest level of encryption and stamps your company name on the browser itself, giving you a nice green glow of trust and authority.


Here’s a nice little summary of what each one gives you:

Where to buy these SSL certificates?
You can find these normally with your current website hosting provider.
For convenience and peace of mind, if you don’t want to dabble with any technical mumbo-jumbo, you can always just pay your current hosting provider, and they will simply activate them for you.
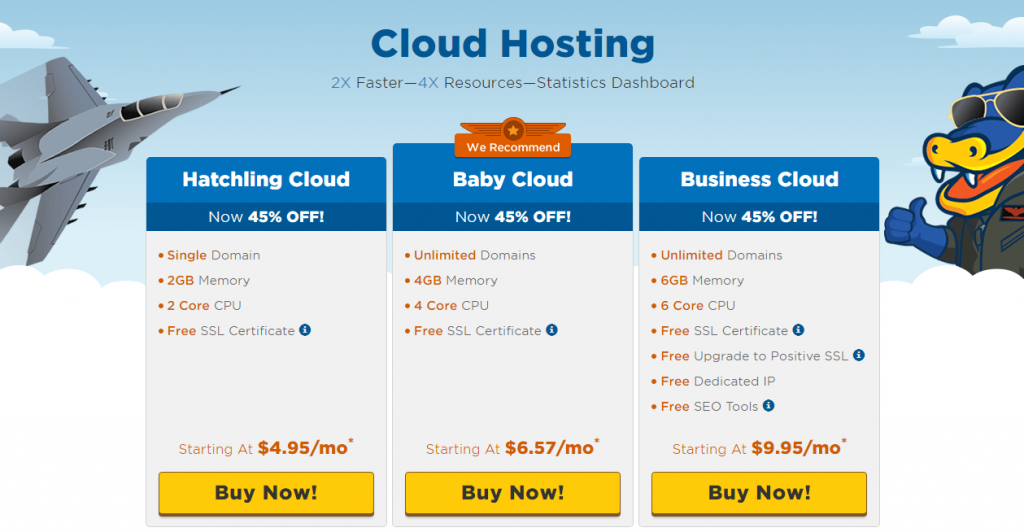
For instance, Hostgator offers a few different types of options for their customers;
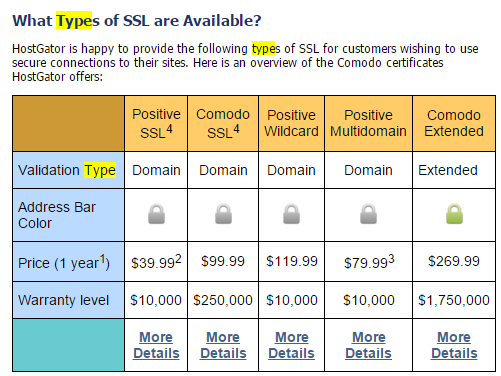

As you can see, the prices are reasonable and guarantee some level of protection.
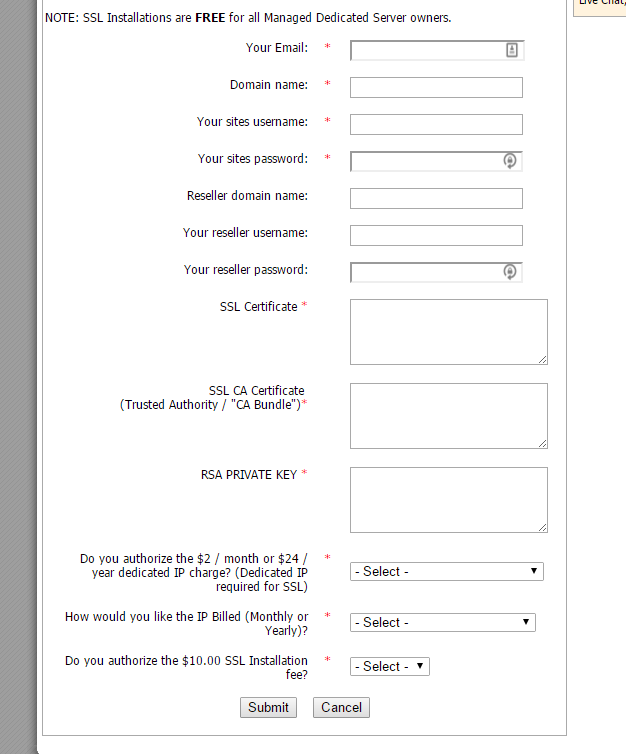
While Hostgator provides you with a Free basic DV SSL certificate, they may not install them for you unless you have a dedicate IP hosting with them. If you’ve got one with them, you can always get them to install it for you here.

Not all hosting providers are going to do this for you…
Each hosting has a different process of installing the certificate.
In short, you will need to create a new URL map of your site and redirect to the HTTPS version.
If your website is:
http://yourname.com
You have to now create a new one to:
https://yourname.com
Even though its just the addition of one “s”. They’re an entirely different URL and Google treats it so.
So what that means is you got to create copies of your entire website and all your pages and then redirect all of your HTTP pages to the new HTTPS pages.
Sounds like a chore right?
Not only that, you have to update all your internal links that you have ever created within your blog posts and point all of them to HTTPS.
What about your images and other links to resources outside your hosting? like stylesheets or scripts?
It’s a huge headache, that’s why I didn’t switch my site until I discovered this option.
I’m going to show you how to switch to HTTPS if you’re using a Hostgator plan.
If you’re with another provider and planning to change your hosting, you can always sign up with Hostgator’s Cloud Hosting solution which I strongly recommend. It will no doubt boost your website’s loading speed tremendously.
Once you’re on board with Hostgator, taking advantage of their Free SSL is a cinch.
How to Enable your Free SSL for…
▽ WordPress
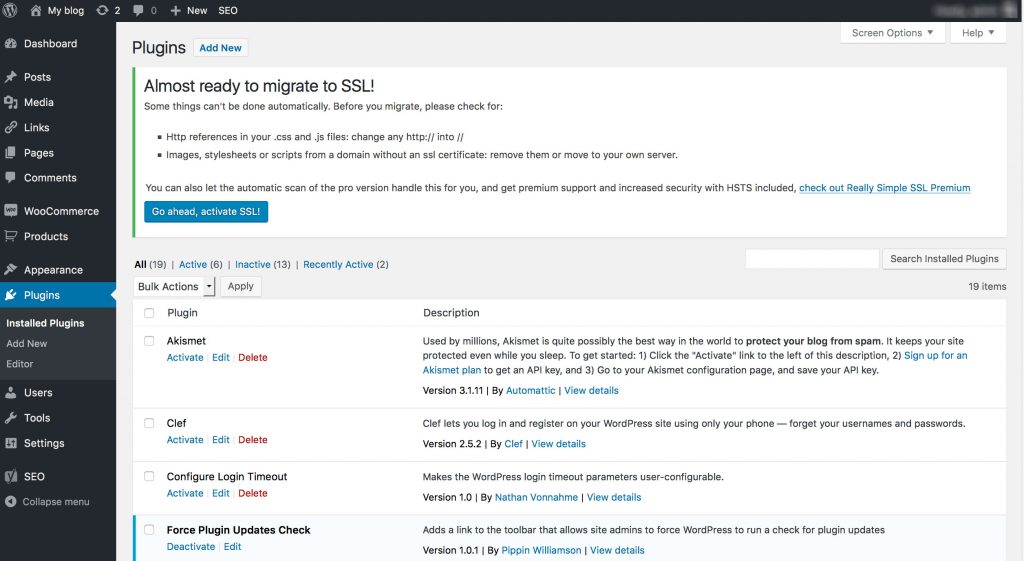
To enable HTTPS on your WordPress installation with HostGator download & install this plugin:
If you do not have an SSL certificate because you’re using another hosting provider, you will first need to get that.
Hostgator already provides a Let’s Encrypt Authority X3 certificate which lasts for 90 days from issuance and auto-renews each 90 day interval, so your site will never be left without an SSL for even a second.
Before you install this plugin on your WordPress:
- Its safe to first make a backup, I use the Updraft plugin.
- You will then see a notice to enable SSL. Click it and you have to login again to see the changes to your site. Voila! Your site should display the green padlock almost immediately.

▽ Joomla
How to force HTTPS for Joomla.
▽ Magento
How to force HTTPS for Magento.
▽ Drupal
How to force HTTPS for Drupal.
▽ HostGator Website Builder
How to force HTTPS for HostGator Website Builder.
▽ Manual
How to force HTTPS manually via .htaccess.
Navigate to your website to test the SSL certificate. If you are redirected to the secure HTTPS:// version of your site, the SSL certificate is working properly. If you don’t see the HTTPS:// prefix, please read the troubleshooting tips with hostgator.
After you got it working, and you’re happy to see the nice green padlock on your web browser, its time to re-add your site to your Google Analytics. Please refer to this site if you were using the Really Simply SSL plugin for wordpress.