


Good news:
Patreon is NOT your only option to grow your membership business and collect online donations.
For online sellers, you don’t have to sell through Amazon which will take a huge percentage of your revenue.
And you don’t need to build an online store from scratch to start making money online.
Think I’m exaggerating?
All you need is adding a WordPress payment form to your website.
Whether you have a product or service to offer, using an order form allows you to collect payments, increase profits, and most importantly- automate your sales process without coding or headaches.
In this article, I’ll walk you step-by-step through the process of creating a simple WordPress form with online payment.
Choosing the Right Plugin for Your WordPress Payment Form
When it comes to selling online, WordPress doesn’t give you the option to create payment forms. To do this, you’ll need to install a plugin.
While there are several excellent tools out there, few of them aim to be really simple. One that I strongly recommend is WPForms.
WPForms is one of the powerful and most beginner-friendly WordPress plugins for creating forms on your website.
With its drag-and-drop builder and pre-made form templates, you can easily create different types of forms such as basic contact forms, email opt-in forms, signature forms, conversational forms, registration forms, guest post submission forms, and payment forms.
Note: The only requirement is that you must have a self-hosted WordPress site to use this plugin.
If you don’t have a WordPress site yet…
I have written a helpful guide to help you start your self-hosted WordPress blog with Bluehost (Only for serious beginners). For less than $4/month, you can create your own blog and get a FREE domain name! click here to get started now.
The Best way to Create a Payment Form in WordPress
The process of creating a payment form for your WordPress is pretty easy.
You’ll be able to create a WordPress payment form in just a couple of minutes, without writing a single line of code, simply by following instructions below.
Let’s get this show on the road
How to Create a Payment Form in WordPress
Step 1. Create a Simple WordPress Form
First of all, you’ll need to install and active WPForms plugin on your WordPress site.
If you need help, check out this article on how to install a WordPress plugin.
Once WPForms is installed, go to “WPForms” > “Add New” to create a new form to your site.
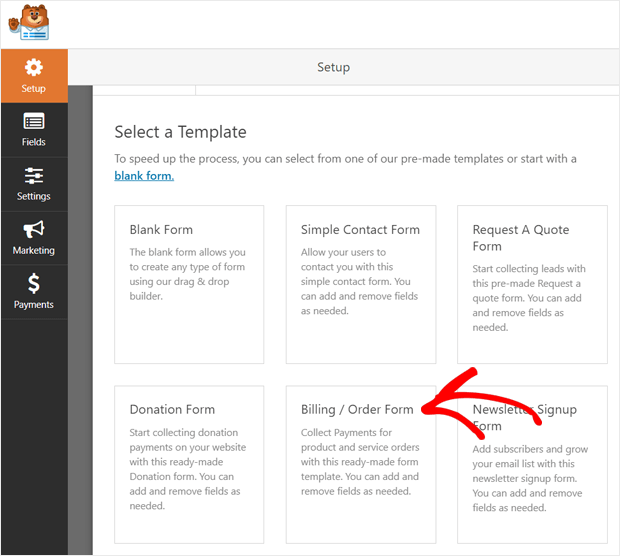
After you click on the button, you’ll be taken to the WPForms form builder. On this setup page, you’ll see a few selections of form templates to choose from.
To get started, simply select “Billing/Order Form”.
Note: If you want to accept donation on your website, choose “Donation Form”. You can also start building a form from scratch by using a “Blank Form”. But using a pre-designed template like the donation form or order form is an easy way to create a customized payment form that matches your brand and website’s style.

Step 2. Add a Payment Field to Your Form
Now you can start customizing the form to match your website as well as add a Payment field to it.
On the visual page editor, simply drag and drop the elements you want to add to your form.
On the default form, you can see some basic fields for collecting information such as customer’s name, email, contact number and address.
While you can use most of these basic fields, our aim here is to add a payment option to your form. To do this, scroll down to the “Available Items” section on the form builder and click on it.
Next, the “Field Options” will show in the left panel.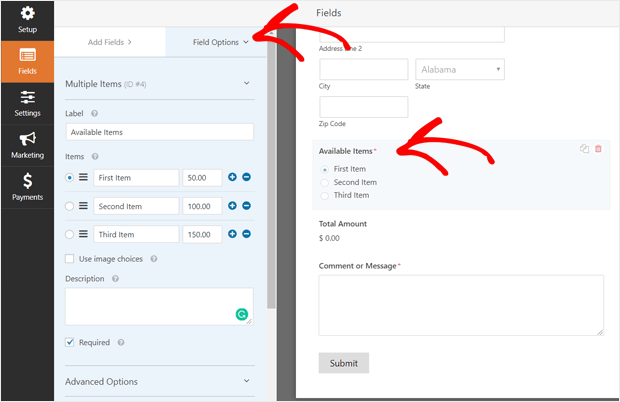

- Rename your products
- Change your prices
- Add more items
- Delete products
- Show product photos in your order form by checking “Use image choices” box
- Add a short description of your products
Once you’re satisfied with your form, click “Save” to continue.
Step 3: Integrate Online Payment Processing
After you’ve designed the form, let’s integrate your form with a payment processor to start collecting payments on your WordPress.
WPForms supports both PayPal and Stripe for accepting payments. Once you decide which payment processor you want to use, you’ll need to install and activate the payment addon by going to “WPForms”> “Addons” page from your dashboard.
After you install the Stripe plugin or Paypal plugin, click “Payment” in the left sidebar.
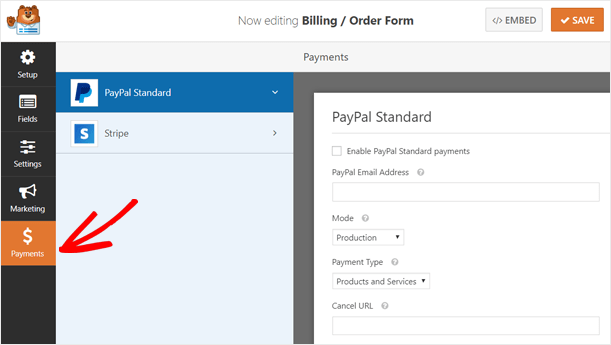

Next, to set up the payment processor, choose either:
(a) Paypal Standard: Select this option if you want to accept payment via Paypal.
- Simply enter your PayPal email address.
- Choose “Production” under Mode.
- Under Payment Type, select “Products and Services”.
OR
(b) Stripe: If you’d like to accept payment via Credit card, go for this processor.
- Connect your WordPress to Stripe by entering secret keys in your WPForms settings.
- Go to “Payment” > “Stripe”, click enable Stripe Payments, write a short payment description.
- Select “Email” under Stripe Payment Receipt if you prefer to send purchase receipts to customers.
Step 4: Configure Your Order Form Settings
Every time a customer successfully complete an order form from your WordPress, they will automatically receive a notification or confirmation from you.
Confirmations and Notifications are two great features to improve your customer satisfaction, build brand loyalty and keep your customer coming back.
(a) General Settings
In the “Settings”, click “General”, here you can give a name to your form, add a short description, submit button and include extra features such as spam prevention and more options.
(b) Notifications
The Notifications allows you to configure the email that you’ll receive when an order is submitted.
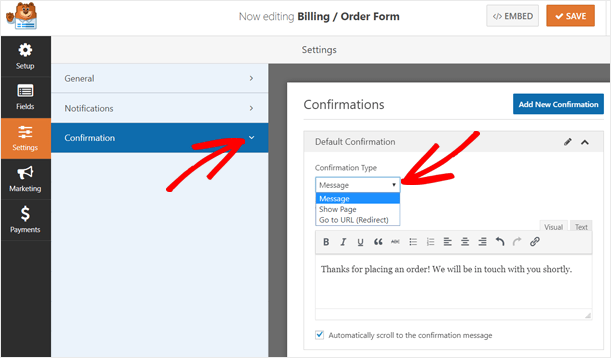
(c) Confirmation
You can configure the confirmation message that users will see after submitting your form. There are three main types of confirmation that you can use:
- Message – The default confirmation type. After a visitor completes a form, a simple message will pop up to tell them that their form was submitted and being processed.
- Show page – Bring customers to a specific page of your site such as Thank you page once the form is submitted,
- Go to URL (Redirect) – Send your customers to any page on your website or a different website.

Step 5: Add the Form to Your WordPress Site
The last step is to add your form to your WordPress site. You can add it to anywhere on your site such as sidebar, footer, page, blog posts etc.
To add the form you’ve just created in the sidebar of your site, simply go to “Appearance” > “Widgets” and add a WPForms widget. Next, you can choose the form from the drop-down option.
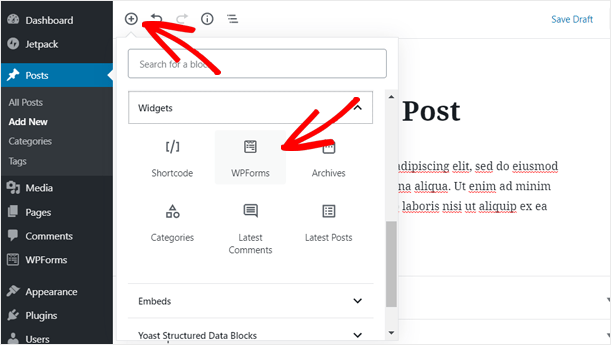
To add the form to a blog post or page, click “+” icon on your editor and select WPForms widget. Once the widget is added to your content, simply choose the form you’ve created.
Don’t forget to click “Save” to keep the latest changes you make.
That’s it. Your payment form is now live on your WordPress site. Simply select the items you want and it will automatically show you the total price.
Conclusion
There you go. Now you can start creating a simple order form, add a payment option to it and accept payment on your WordPress in 5 simple steps!
No coding skills required.
Plus, all payment forms are mobile responsive so they will work perfectly on every device. With the fully customizable, you can easily create a user-friendly payment form in no time. Save your time and effort.
This Payment option is available for users with WPForms Pro plan. You can get this feature-rich Pro plan for less than $17 per month.
To save you maximum money, use this link to get 50% OFF on WPForms. (I got the price down for you)
Are you ready to learn how to create payment forms for your WordPress site?
Pro Tip: Use MonsterInsights plugin to track your form performance. Simply activate its Forms Tracking addon, it will help you better understand your audience and optimize your form for maximum conversions.
Do you have any question about adding an online payment option to your WordPress site? Feel free to comment below.
Also read:
- 12 Best Free WordPress Plugins Every Blog Needs
- How to create a signature form in WordPress
- How to create quick and easy Conversational Forms
- How to Blog Yourself into Popularity Plain and Simple…
Last but not least, if this post was of any help to you, please share it on Facebook, Pinterest and Twitter.
A quick share from you would seriously help the growth of this blog.
Thank you so much!
I live and breath making an income online.
I’ll be sharing more of ideas and guides soon. Stay tuned.
If you haven’t already, sign up here to receive my emails and a free magazine subscription.