


As your business grows, it’s inevitable that you’ll want to setup your own website to accept payments safely, easily and directly from your customers.
Whether you’re looking to list a few products or services for sale, or simply asking for donations, having your own Payment forms on your website/blog is the way to go.
Why writing on Medium for meager earnings when you can have your own paid newsletter?
Why paying unnecessary fees to Patreon when your followers can make donations 100% directly to your Payment forms?
Why going through the troubles of creating and sending invoices to clients when you can easily collect payments on your own website?
The thing is… accepting credit card payments online on any of your WordPress forms is easier than you think.
You only need to set it up once, then the system is fully automated – Giving you more time to focus on building your business or blog.
Most importantly, it’s imperative to boost conversion rate, build trust and develop long-term relationships with your loyal customers.
That’s where Stripe + WPForms come in.
In this article, I will walk you through the entire process of creating Stripe payment forms so that you can start accepting credit cards on your website right away!
Introducing Stripe Addon for WPForms
That being said, I just discovered a beautiful partnership between Stripe and WPForms that makes it super easy and simple to integrate payment processing into your site.
Plus, you don’t have to be tech-savvy or knowing how to code.
So what is Stripe?
Stripe is the best online payment solution in the market. It’s used by big corporations such as Amazon, Facebook and Shopify.
Now, with the help of WPForms – the most beginner-friendly WordPress form plugin, this trusted payment processor is also accessible by small businesses, creative entrepreneurs and bloggers, like you and me!
Stripe will take care of keeping the credit cards and personal data secure.
The WPForms plugin is a straightforward tool to help you accept payments with WordPress. You can use it to create unlimited number of online payment forms- anywhere on your site including pages, posts, sidebar widgets etc. This way, your audience can pay you right on your website by simply entering their credit cards, without ever leaving your site.
The plugin is incredibly simple to install. Setup, configure it and sell products or services shouldn’t take more than a few minutes.
If you’re looking to create a simple order form/donation, or want to accept one-time payments or recurring payments without hassle, WPform’s Stripe add-on is the perfect solution for you.
Are you ready to start generating income through your WordPress website or blog?
Let’s dive in.
How to Connect Stripe with Your WordPress Payment Form in 5 Easy Steps
Before we get started, you’ll need to get your Stripe account ready. If you don’t have a Stripe account yet, check it out here.
I got my Stripe account for free when I incorporated my business in the US with Stripe Atlas. If you’re curious, you can read more here…
The great thing about Stripe is that your customers don’t need to have an account to make a payment on your WordPress site. In addition to that, it accepts over 100 foreign currencies and convert them automatically, which is particularly useful for doing international business and maximize your earning potential.
Step 1: Installing WPForms Plugin
First of all, install and activate the WPForms plugin.
If you need help, check out this article on how to install a WordPress plugin.
Note: While you can use WPForms for free, you’ll need to purchase at least the Pro plan to unlock this Stripe Addon feature. Not only that, it offers many options to create surveys, polls, conversational forms, form landing pages and more. Yes, it costs a bit, but consider generating more leads and sales with your existing traffic right inside your WordPress Dashboard- it’s totally worth the small investment!
WPForms is my #1 contact form plugin. I’ve written a few guides that you may want to check out later:
- How to Save Lost Leads and Sales in 4 Simple Steps
- How to Create Quick and Easy Conversational Forms in WordPress
- How To Create A Signature Form In 3 Simple Steps
- How to Create a WordPress Form with Online Payments
To save you maximum money, use this link to get 50% OFF on WPForms. (I got the price down for you)
Step 2: Connecting Stripe to Your WordPress Site
Once WPForms is installed, you’ll need to install and activate the Stripe addon. On your WordPress admin dashboard, go to “WPForms” > “Addon”. Search for Stripe, click “Install Addon” button and activate it.
Then, go to “WPForms” > “Settings”. Search for the Payment tab and click on it. Here, you have the option to select the currency you want to use from the dropdown.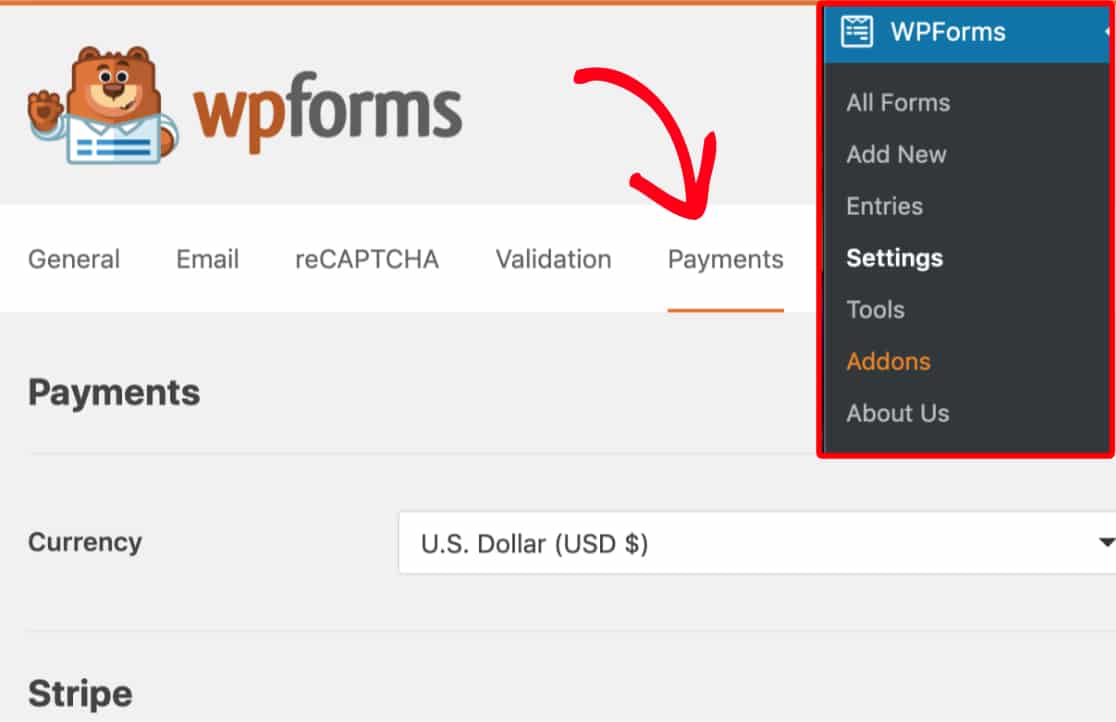

Once you choose your currency, scroll down to the Stripe section, and click “Connect with Stripe”.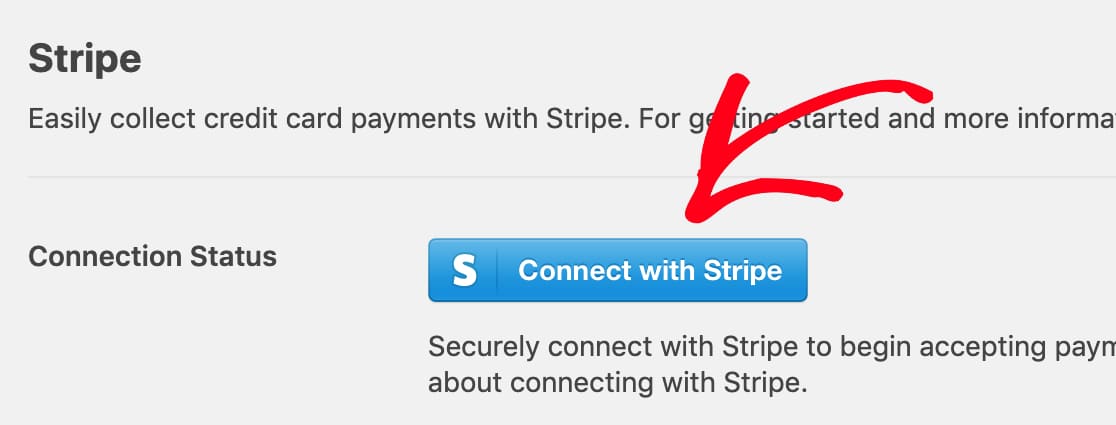

After that, you have to authorize the connection between Stripe and your forms. Login to your Stripe and you’ll see a page like this:
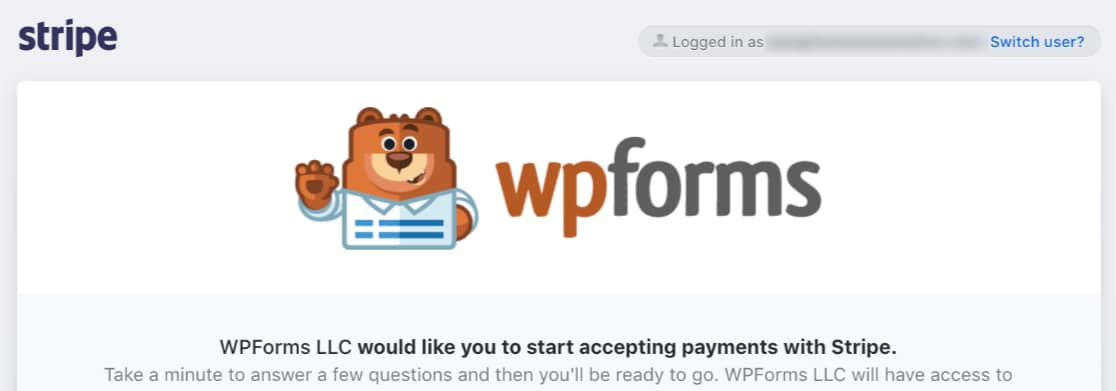

Once you follow the instructions and agree to the requirements, you’ll be redirected back to your WordPress’s admin page. If you’re doing this step correctly, you’ll see the Connection Status has a green mark as shown in the screenshot below: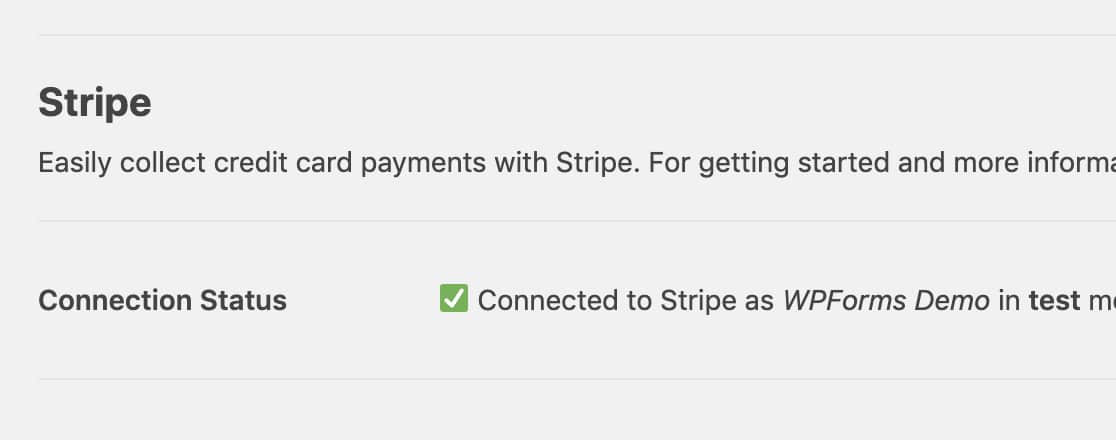

Step 3: Adding Stripe to Your Forms
Now you have connected Stripe and WPForms to your blog, let’s start creating online forms with Stripe payment option.
You can either create a new form or add Stripe payment to an existing form.
In order for this Stripe payment to work, you need at least two form fields as below:
- An item field (Checkbox Items, Single Item, Multiple Items, or Dropdown Items)
- A Stripe Credit Card field
While you can add as many other fields as you like in your form, it’s advisable to only require important details from your users to reduce form abandonment.
For example, this is how a simple order form created WPForms’s Stripe addon will look like: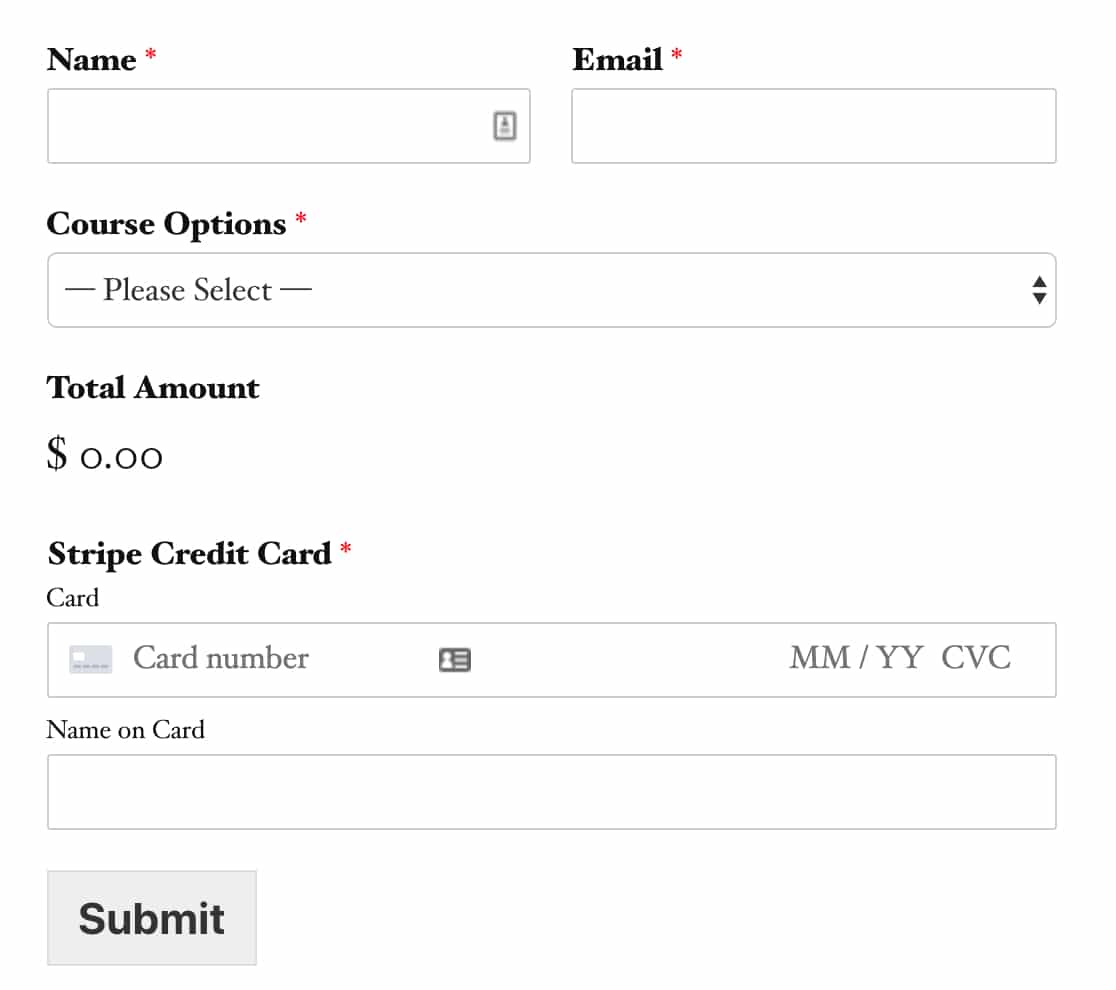

Step 4: Enabling Stripe Payment for the form
Once you’re satisfied with your form, you will need to turn on the Stripe Payment for it to work. Go to “Payment” > “Stripe”. From the Stripe panel, check the box labeled “Enable Stripe Payments”.
You can then add a short Payment Description. Your customers will see this message on their credit card statements. If you like to email a payment receipt to your customer, simply choose the email field under “Stripe Payment Receipt” the form.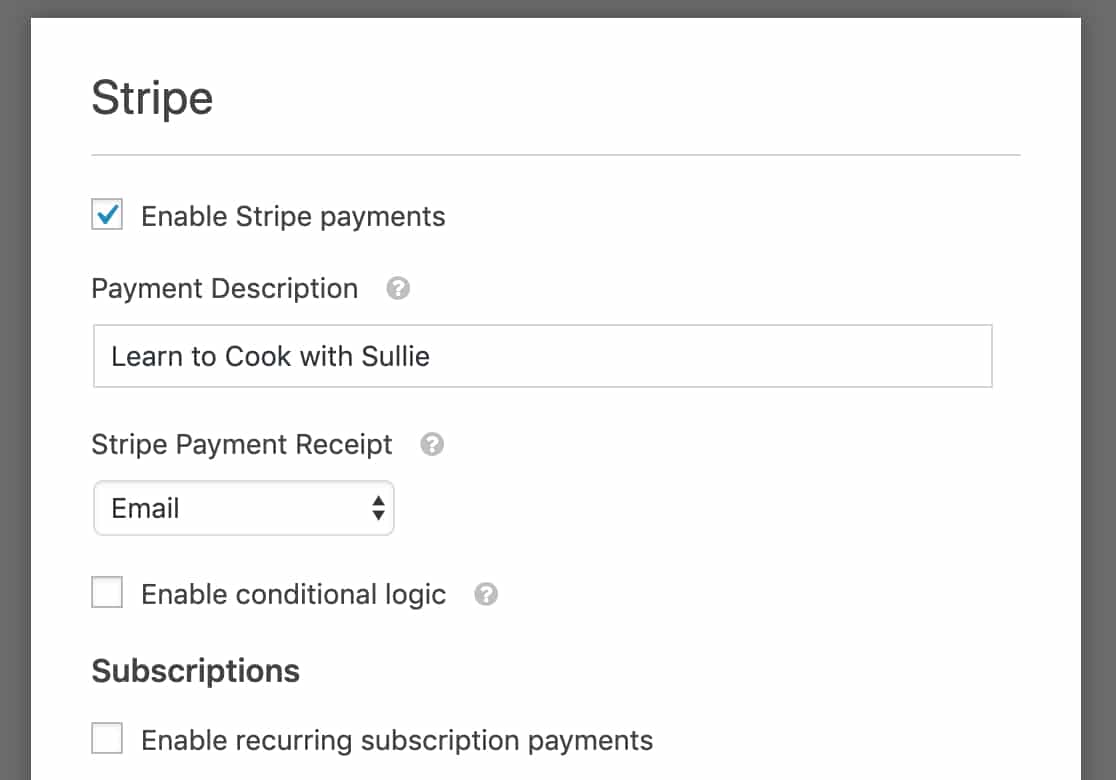

Now you’ve successfully created a one-time payment form. If you want to receive recurring payment, follow step 5 below.
Step 5 (OPTIONAL)
The Stripe addon settings offer two additional options:
- Recurring Subscription payments: Accept continual payments from repeat customers.
- Conditional Logic: Allow your customers to choose between making one-time payment/recurring payment
(A) Setting up Recurring/Subscription Payments
Within the same settings panel, check the box labeled Enable recurring subscription payments to setup a recurring payment. Next, this additional settings will appear: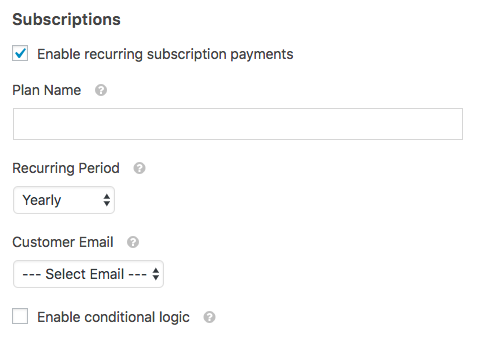

- Plan Name: Give a title for your subscription, such as “The Complete Digital Guide for X”, “Donation to X”, ” X Success Course”. This will appear within the Stripe transaction.
- Recurring Period: Choose how often the subscription payments should occur: Daily, Weekly, Monthly, Quarterly, Semi-Yearly, or Yearly.
- Customer Email: Select an Email field from your form where you customer can be contacted.
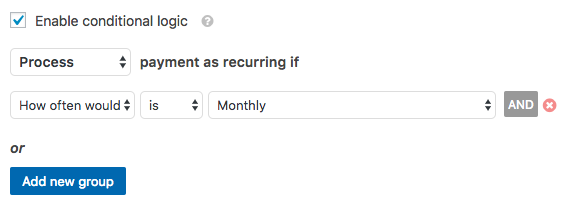
(B) Setting Up Conditional Logic for Payments
WPForms is the only form solution that you’ll ever need for your WordPress blog. The plugin has Conditional Logic option which allows you to create “Smart Forms”. Which means that it will automatically change the form accordingly based on a user’s selections.
Don’t forget to enable the Conditional Logic if you want to let your customers choose between making a one-time payment or setting up recurring payments.
In this example, we set up a conditional rule: Process payment as recurring if Payment type is Monthly.
Whenever a customer select the monthly option on the payment form, it will trigger recurring payment automatically.

For more tips and advice on using Stripe Addon with WPForms, I suggest you check out this detailed document.
Conclusion
There you go. Now you can start creating a simple order form, add a Stripe payment option to it and accept credit card payment right within your WordPress site in 5 simple steps.
No coding skills required.
Plus, all payment forms are mobile responsive so they will work perfectly on every device. With the fully customizable, you can easily create a user-friendly payment form in no time. Save your time and effort.
This Payment option is available for users with WPForms Pro plan. You can get this feature-rich Pro plan for less than $17 per month.
To save you maximum money, use this link to get 50% OFF on WPForms. (I got the price down for you)
Are you ready to learn how to create payment forms for your WordPress site?
Pro Tip: Use MonsterInsights plugin to track your form performance. Simply activate its Forms Tracking addon, it will help you better understand your audience and optimize your form for maximum conversions.
Do you have any question about adding an online payment option to your WordPress site? Feel free to comment below.
Also read:
- 12 Best Free WordPress Plugins Every Blog Needs
- How to create a signature form in WordPress
- How to create quick and easy Conversational Forms
- How to Blog Yourself into Popularity Plain and Simple…
Last but not least, if this post was of any help to you, please share it on Facebook, Pinterest and Twitter.
A quick share from you would seriously help the growth of this blog.
Thank you so much!
I live and breathe making an income online.
I’ll be sharing more ideas and guides soon. Stay tuned.
If you haven’t already, sign up here to receive my emails.