


Wondering how to receive payments for your products or services directly from your website?
We’ve got you covered.
In this article, I will walk you through the entire process of creating PayPal payment forms so that you can start accepting payments on your website right away!
Accept PayPal Payments with WPForms
PayPay is undoubtedly the most popular online payment system that allows you to send and receive money to almost anywhere in the world.
And integrating PayPal into your online form can make converting customers so much easier. All your potential customers need to do is simply click on the “Checkout with PayPal” button to pay for products/ services or make a donation.
If you have no technical background or budget to hire a professional developer, setting up PayPal on your WordPress site manually, from scratch, would be an impossible task.
That’s where WPForms comes in.
WPForms plugin is a straightforward tool to help you accept payments with WordPress. Besides PayPal, you can also activate the Stripe add on to accept one-time or recurring credit card payments without hassle.
You only need to set it up once, then the system is fully automated – Allowing you to collect payments, increase profits, and most importantly- automate your sales process without coding or headaches.
Why You Need a PayPal Add-on?
WPForm’s PayPal addon allows you to easily and quickly integrate your website with PayPal, so that you can:
- Sell digital products such as plugins, themes, printables or ebooks
- accept donations for a worthy cause
- create online forms for physical products
- receive payments for services such as consultation workshops etc.
Here’s how it works:
You can either choose to create an order form with its pre-made form templates or start from scratch with a blank form.
You can customize the form, add and remove fields by using its drag-and-drop builder.
Once it’s done, attach your PayPal payment form to any web-pages you like.
Whenever a user fills out a form on your site, they’ll be immediately taken to the PayPal site to complete payment.
It’s secure, reliable and convenient.
How to Accept Payments with PayPal?
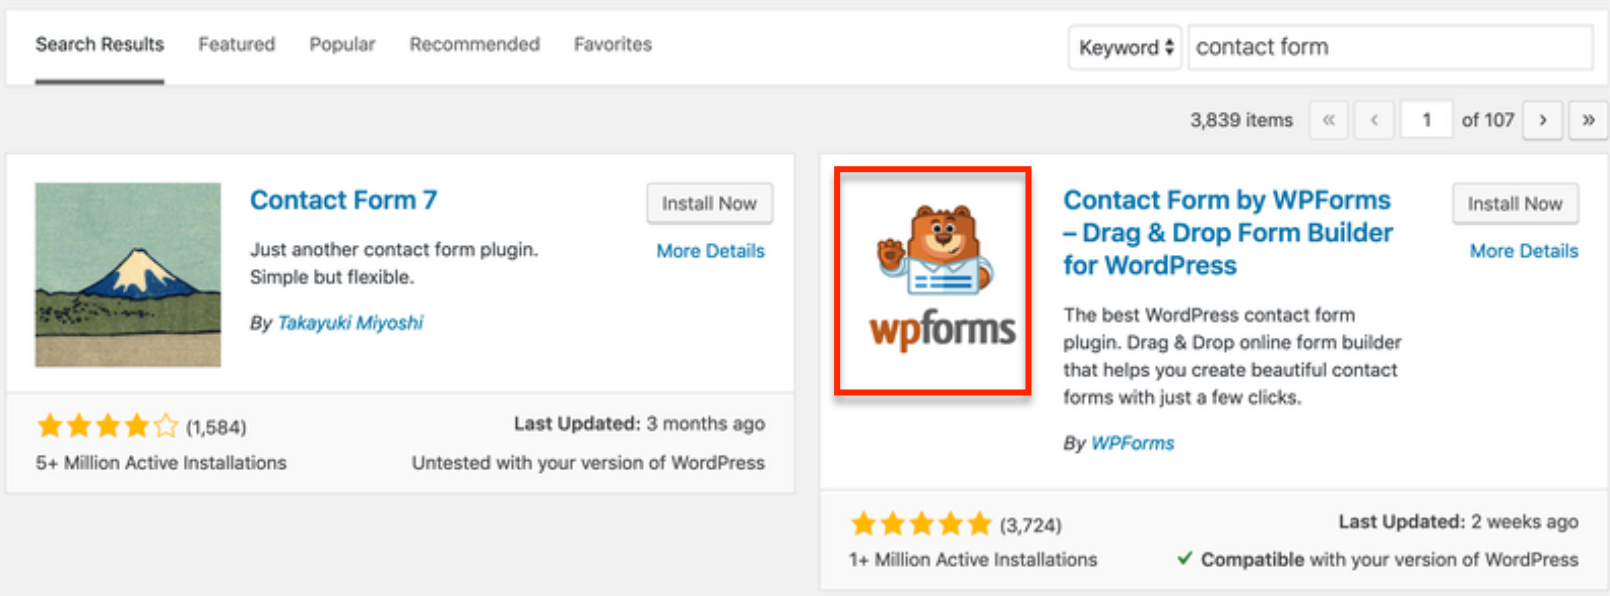
Step 1: Install WPForms Plugin
First of all, install and activate the WPForms plugin.
If you need help, check out this article on how to install a WordPress plugin.

WPForms is my #1 contact form plugin. I’ve written a few guides that you may want to check out later:
- How to Save Lost Leads and Sales in 4 Simple Steps
- How to Create Quick and Easy Conversational Forms in WordPress
- How To Create A Signature Form In 3 Simple Steps
- How to Create a WordPress Form with Online Payments
- How to Connect Stripe with WordPress Payment Form (The Easiest Way)
To save you maximum money, use this link to get 50% OFF on WPForms. (I got the price down for you)
Step 2: Install the PayPal Addon
Once WPForms is installed, you’ll need to install and activate the PayPal addon.
On your WordPress admin dashboard, go to “WPForms” > “Addon”. Search for PayPal, click “Install Addon” button and activate it.
Step 3: Create a New Form
Now let’s create a new form and add PayPal addon to it.
As an example, we’re going to create a new form using the “Billing/Order Form” template.
Note: You can choose any other form template that you like, the editing process is the same. If you want to accept donation on your website, choose “Donation Form”. You can also start building a form from scratch by using a “Blank Form”. But using a pre-designed template like the donation form or order form is an easy way to create a customized payment form that matches your brand and website’s style.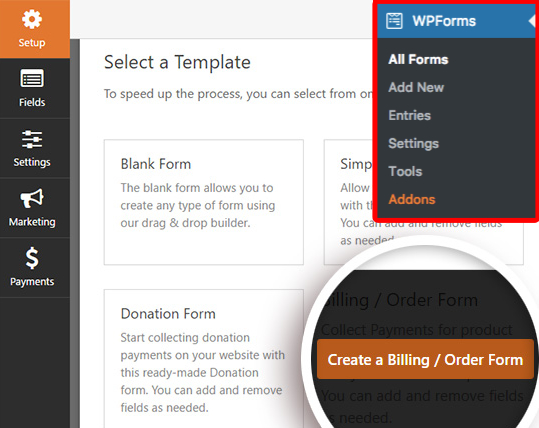

If you’d like to accept payments for your products/services, then use the “Billing/Order form” template.
Next, customize your form by adding or removing fields such as customer’s name, email, address, contact number, your product name, item field etc.
You can also add a Total field to your form, though it’s not mandatory, but it will easier for you users to see the total amount that they’ll be paying.
Here’s the great part, you don’t need to add a “Credit Card” field in your form, because all sensitive payment card details will be collected on PayPal’s site once the form is submitted.
Step 4: Add PayPal Payments to Your Forms
Now you have created your online form, let’s connect it to PayPal.
To add PayPal payments to your form, go to “Payments” > “PayPal Standard”. From here, look for “Enable PayPal Standard payments” and check the box.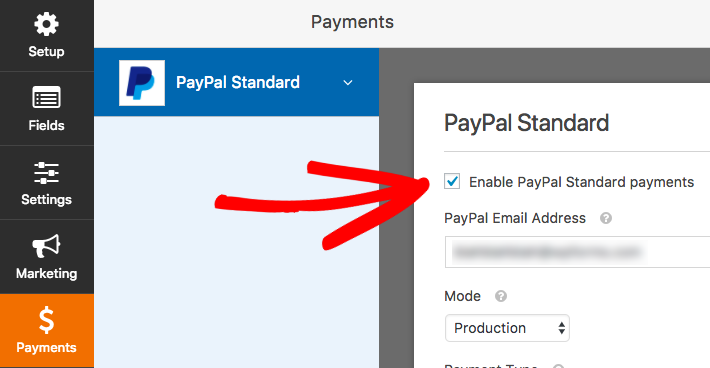

There are a few things that you’ll need to fill out on PayPal settings:
- PayPal Email Address: Enter the email you use for your PayPal account. This is where you’ll receive your payment
- Mode: Choose either Production or Test/Sandbox (if you’d like to test a PayPal transaction before accepting real payments)
- Payment Types: Choose Products and Services or Donation
- Cancel URL: Enter the desired URL you like to direct your user to if they fail to complete payment on PayPal
- Shipping: If you’re shipping physical products to users, you can require an address field during PayPal’s checkout process
Scroll down the visual page editor, you’ll see there are two checkbox options:
- Don’t ask buyer to include a note with payment: Check this box if you don’t need your customers to add any notes in the PayPal checkout.
- Enable Conditional Logic: Check this box if you want to let your users choose between making payments with Stripe or PayPal.
Remember to save all the changes you made.
Step 5: (Optional) Set Up Conditional Logic for Payments
This is an advanced option that allows you to create “Smart Forms” that will automatically change the content accordingly based on a user’s selections.
Enable the Conditional Logic if you want to:
- Allow your users to choose to pay with Stripe or PayPal
- Make payment optional
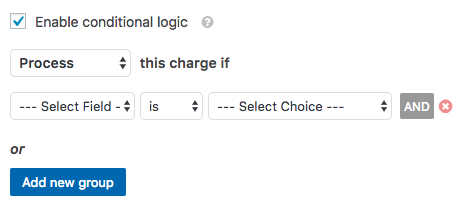
To set up conditional logic for PayPal payments, go to “Payment” > “PayPal Standard” and checkthe box labeled “Enable conditional logic”.


Next, you’ll see there are some additional options that you need to enter. Here, you can set your own rule about when the user should be sent to PayPal to complete the payment process.
- Process: Options are Process and Don’t Process. Determine what will happen next once a user fulfills the condition you set.
- Select Field: Choose where do you’d like to apply this rule.
- is: Options are is, is not, empty, not empty, contains, does not contain, starts with, ends with, greater than, and less than.
- Select Choice: Determine what value you’d like the field to contain in order for this condition to apply.

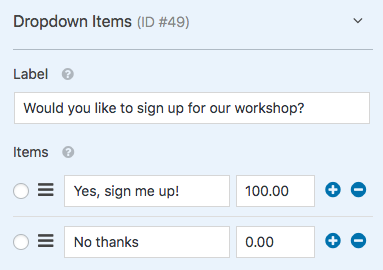
To make it easier for you to understand, let’s see this example: I’m going to set up conditional logic to ONLY run a PayPal payment if a user chooses to register for my workshop.
To do that, I add a Dropdown Items field to set my conditional logic rule. Here, I offer two options to users to choose whether if they’d like to sign up for the workshop.
Once this field is all set, go to “Payments” >”PayPal Standard” and check the box “Enable conditional logic”.

From now on, users will be taken to complete a PayPal transaction only if they do choose to sign up for the workshop.
To configure the rule for this, let’s set the dropdowns as:
Process this charge if Would you like to sign up for our workshop? is set to Yes, sign me up!
This means that we will only need to process a PayPal payment if a user submits the form AND choose to sign up for workshop.


That’s it. Now you’ve successfully add PayPal to your form. Add the form to your WordPress site such as page, blogposts etc and start collecting PayPal payments from your audience.
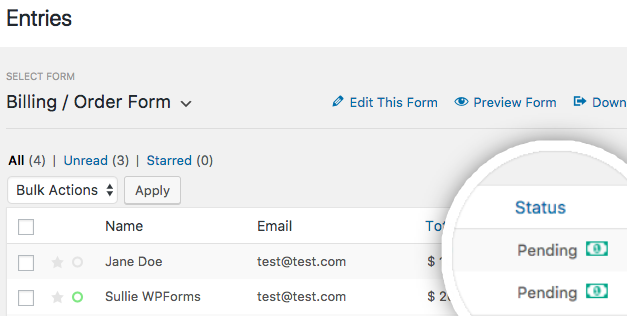
How to check who’s completing payment on PayPal website?
On your WordPress dashboard, under Entries, you can see a list of users who have submitted forms on your website. The Entries page will show a Pending status when a user submits a form. The status will change to “Completed” once the Paypal payment is made.

Conclusion
There you go. Now you can start creating a billing/donation form, add a PayPal option to it and start accepting payments right within your WordPress site in few simple steps.
Also, you can test your payment form before accepting actual payments by setting up Test Mode.
No coding skills required.
Plus, all payment information securely conducted on PayPal’s site. With the fully customizable, you can easily create a user-friendly payment form in no time. Save your time and effort.
This Payment option is available for users with WPForms Pro plan. You can get this feature-rich Pro plan for less than $17 per month.
To save you maximum money, use this link to get 50% OFF on WPForms. (I got the price down for you)
Are you ready to learn how to create payment forms for your WordPress site?
Pro Tip: Use MonsterInsights plugin to track your form performance. Simply activate its Forms Tracking addon, it will help you better understand your audience and optimize your form for maximum conversions.
Do you have any question about adding an online payment option to your WordPress site? Feel free to comment below.
Also read:
- 12 Best Free WordPress Plugins Every Blog Needs
- How to create a signature form in WordPress
- How to create quick and easy Conversational Forms
- How to Blog Yourself into Popularity Plain and Simple…
- How to Connect Stripe with WordPress Payment Form
Last but not least, if this post was of any help to you, please share it on Facebook, Pinterest and Twitter.
A quick share from you would seriously help the growth of this blog.
Thank you so much!
I live and breathe making an income online.
I’ll be sharing more ideas and guides soon. Stay tuned.
If you haven’t already, sign up here to receive my emails.