


Wondering how to take, edit and share a screenshot all at once?
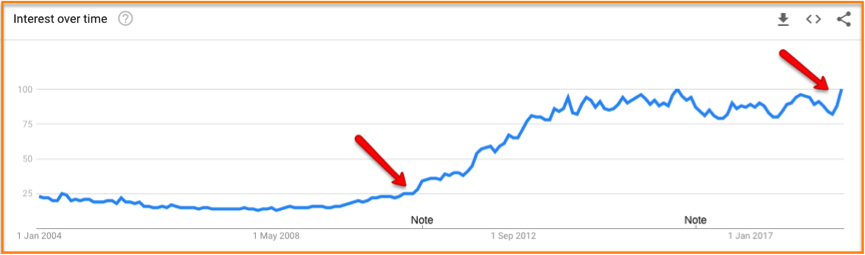
There has been a rapidly growing interest in screenshots since 2010.
Screenshots have been widely used for many purposes, allowing you to save anything on your computer screen and share with whomever you want.

Probably, you’ve seen or even used them to demonstrate your new online course, to deliver clear explanation in your blog posts, to report an error message or simply taking screenshots of funny comments on Twitter to share with your friends.
Undeniably, screenshots are extremely crucial when it comes to explaining something hard to express in words.
As the cliché goes, “A picture is worth a thousand words”.
Apart from taking a picture from your computer, screenshots can help to promote your brand and communicate more effectively if it’s used properly.
The good news is you don’t have to use multiple tools for capturing, editing, annotating screen grabs.
This free screen capture software allows you to do all the works in one single platform.
Related Reading:


If you’re a Mac user, just like myself, you actually don’t need a screenshot tool.
You can do almost everything with these keyboard shortcuts:
- To capture the whole screen, press Ctrl]+[Shift]+[3]
- To capture a section of the screen, press [Ctrl]+[Shift]+[4]
But if you want to do more with your screenshots like adding comments, text box and many others, then you might need to do more steps as below:
- Take a screenshot with the built in screen capture tool
- Open Paint or PowerPoint Program
- Paste your shots on PowerPoint or Paint
- Annotate and edit it
- Save it
- Share the screenshot file
I don’t know about you but for me, it’s really troublesome. Before sharing the shots, I have to use Microsoft PowerPoint to edit them.
While wondering if there’s any free application that simplifies the process, I’m lucky to stumble upon ScreenTray-one of the best screenshot tools.
I didn’t know exactly how much better this tool compared to many other applications out there, but one thing for sure it has saved me tons of time, so I can focus on other things that matter most.
This is not a sponsored post. I hope you’ll find it as useful and timesaving as I did.
Why ScreenTray?
ScreenTray is a MacOS app that makes the process of capturing, editing, sharing screenshots amazingly simple.
Here’s are the few main things that I like about ScreenTray:
- Its simple interface and crisp clean layout is very user-friendly.
- It provides an all-in-solution for editing and sharing screenshot. You can easily take a screenshot, edit and share it all in one place. This is a real time-saver!
- It has a powerful annotation tool with a robust set of editing options.
- It offers advanced cloud integration that works nicely with Dropbox and Google Drive.
- It’s very easy to publish your screenshot online and you’ll get a shareable link. You can then paste this link to management application such Trello. This helps to declutter your computer and organized your projects efficiently.
- You can promote your brands by using the logo of you company on the screenshots. But in order to remove the watermark you’ll need to buy a license.
- It’s free.
The best free screen capture software
How to quickly make and annotate screenshots with ScreenTray
-
Take a screenshot

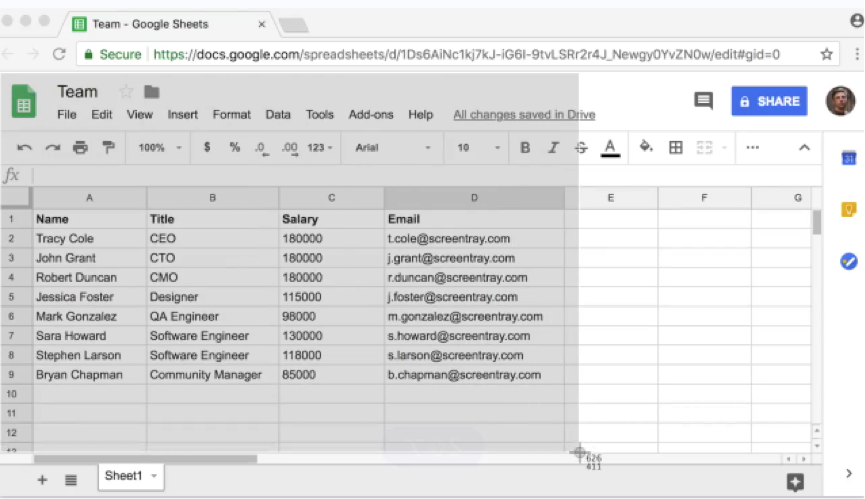
Photo courtesy of ScreenTray
ScreenTray is a relatively new screen captures software. And at the time of this writing, it’s only available on MacOS.
To get started, go to ScreenTray to download the software.
Once you’ve installed the tool, open any file that you want to screen capture.
Similar to most other screenshots applications, all you need to do is click and drag the cursor to save a specific region of your screen.
And it will generate a screenshot instantly.
-
Annotate your screenshot
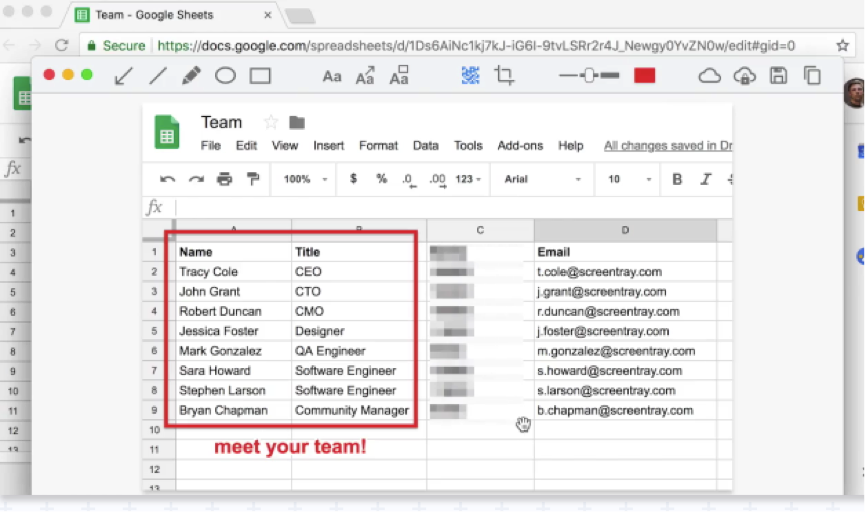

This handy annotation tool allows you to mark up your screenshot with text box, comment, arrow, highlight and more. One of my favorite features is the blur effect, enabling you to hide any sensitive content.
To change the color of your text, simply select your preferred color from the color ticker.


-
Upload your screenshots
Once you’re done with the annotation, click “Save” to continue.
You have two file uploading options:
(i) Private folders – upload your screenshots to a private folder for sharing private information with your team.
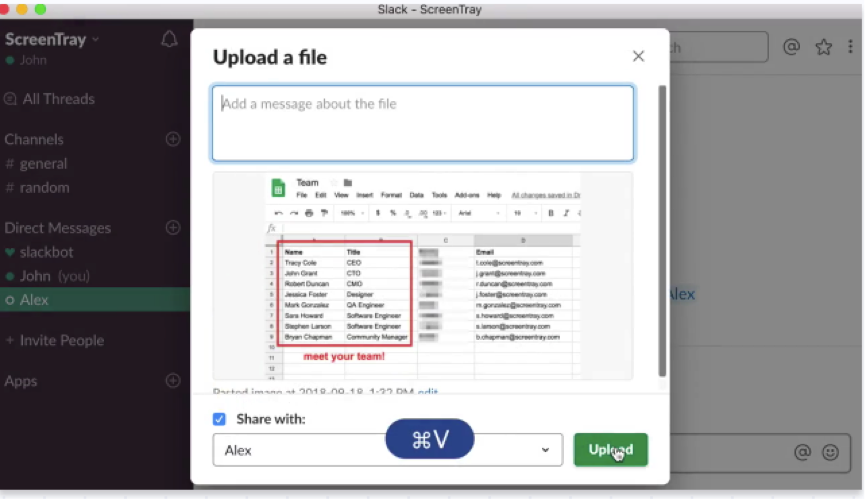

On top of that, you can also upload screenshots to Google Drive and Dropbox.
Or simply copy your screenshots to the clipboard and pasting them into applications such as Skype, Trello, Slack and Jira.


-
Promote your brand (Optional)
If you have a budget or plan to promote your brand with screenshots, then you might want to look into ScreenTray. It has this cool option where you can buy the license for $15 and put the logo of your company on screenshots.

By having your company logo on the screenshot, it might be a great way to build your brand awareness.
Personally, I haven’t tried this feature yet. But I think it’s a great way to build and establish your brand presence online.
The best part of all- it’s completely free to use. Of course, you’ll have a small watermark on your screenshots.
Conclusion
If you’re doing lots of screen captures work, you may need a useful tool like ScreenTray to save you time, effort and increase your productivity.
However, it’s only available for MacOS. For Window user, you may want to check out Jing at the mean time.
Do you have any experience with ScreenTray?
What’s your favorite Screenshots editor tool?
Do you have great software to share with us? Feel free to comment below.
I live and breathe making an income online.
I’ll be sharing more of ideas and guides soon. Stay tuned.
If you haven’t already, sign up here to receive my emails and a free magazine subscription.
If you’re interested in starting your own self-hosted blog, take a look at my step-by-step guide. I’ll show you everything you need to do to start a successful money-making blog.
Here’s a list of best resources and tools for your blog! I use them to manage, optimize and grow my blog. I’m sure they’ll help you as much as they’ve helped me.